A Beginning
The Falklands’ War — although never officially declared as such — was a short-lived affair, not that anyone called to action had an inkling of the likely duration. As a battalion engaged in training for the limited war role of assisted evacuation operations outside the NATO area, we were fortunate to have spent the autumn of 1981 in Kenya, where opportunities for replicating battle conditions in live training were exemplary. If the package lacked anything, emphasis was on company group operations, rather than at battalion level. However, viewed in hindsight, Lt Col ‘H’ Jones’s intent (our CO) to instil in us a self-belief to undertake any task and succeed was enhanced in those fortuitously timed but invaluable eight weeks.
Dawn on 2nd April 1982 brought a considerable challenge for Mrs Thatcher’s government: the Falkland Islands had been invaded by Argentine forces. Her statement to the House of Commons on the following day — notably a Saturday — set the tone for what was to come: ‘The Government have now decided that a large task force will sail as soon as all preparations are complete. HMS "Invincible" will be in the lead and will leave port on Monday.’ (1). To the men of 2 PARA’s considerable concern, emerging plans did not envisage their participation.
Sailing south, Brigadier Thompson, commanding 3 Commando Brigade (3 Cdo Bde), determined to enhance his force once intelligence reports indicated that the defending Argentine garrison was at least twice the size of his formation. 2 PARA would now join 3 PARA to give Thompson five fighting units with which to regain the Islands. While the CO went ahead to join the Task Force, the battalion made final preparations, including the key addition of a second general purpose machine-gun per rifle section, and one M79 per platoon, stimulated by a variety of experiences, not least of 22 SAS in Dhofar.
Sailing South on the MV Norland
Whatever misgivings the civilian crew of the MV Norland might have had about transporting 2 PARA to the Falkland Islands, they did not show it. Under the exemplary command of captain Don Ellerby, ably assisted by Naval Party 1850, a desire to find practical ways to help each other soon brought an extraordinary harmony. Used to taking travellers back and forth from Hull to Rotterdam, the crew proved to be an adaptable, cheerful and dedicated group of people whose courage and fortitude in the South Atlantic should never be forgotten.
Over a passage of three weeks, days were filled with training for war. From weapon training to aircraft recognition, fitness and medical skills, nothing was left to chance in long days at sea, with the emphasis on skills at company level.
Live firing of all weapons was crucial. However, the firing of the hand-held air
defence BLOWPIPE missile did not give confidence to the firers nor those observing: the missile turned back on itself after launching. From ‘Lessons’ in the Official History (2): “On land the missiles had been unreliable, although this was in part because they were designed to attack targets head on rather than crossing, which is how most appeared.”
Captain Hughes, our doctor, led discussions on how best to deal with casualties: in Northern Ireland — the battalion’s previous operational tour of duty — the emphasis had been on immediate first aid, followed by swift helicopter evacuation as terrorists slipped away to avoid capture. In a conventional war, a different approach would be required: in the first instance, self-help, using the morphine and saline drip issued to every soldier, since in the assault there would be no opportunity to help wounded comrades until the objective was secured. The doctor placed importance on every man learning how to insert a drip — an essential first step to reducing shock.
With the benefit of hindsight, too little emphasis was placed upon the vital training of battalion headquarters: one twelve-hour command post exercise was deemed sufficient among a raft of key tasks. With a mix of new people into what would become ‘main headquarters’ in the field, this was to prove a costly error. Much later it transpired: “Command and leadership at battle group level was poor. The headquarters did not operate as a team. HQ 2 PARA had been identified as weak by the GOC Commanding South East District, prior to deployment.” (3)
Padre Cooper too played an important role. Apart from training the snipers — as an experienced member of the Great Britain shooting team — he prepared us mentally for what was to come. His final Sunday service drew voluntarily every man not on essential duties to the helicopter deck, where on a gently rolling sea, he reminded us: ‘We are about to enter the cauldron and some of us will not be coming back. I do not believe in God who will divert the path of a bullet, but I do believe in God who cares for each of us and has the power to carry that care beyond death. Captain Hughes and I will do all we can to care for you in the coming weeks, whatever happens’.
As God’s agent, we were fortunate to have the padre’s wisdom to guide our thoughts. Every man was aware of his mortality: he brought the reality into the open and calmed what fears we might have had. As Major Crosland (OC B Coy) has opined: the doctor and the padre provided the final glue which held the battalion together.
Occasional excitements brought the reality of conflict into focus when the fleet went into defensive drills, watchful for reports of Argentine submarines. More sobering was the sinking of HMS Sheffield on 10th May.
Preparation for War
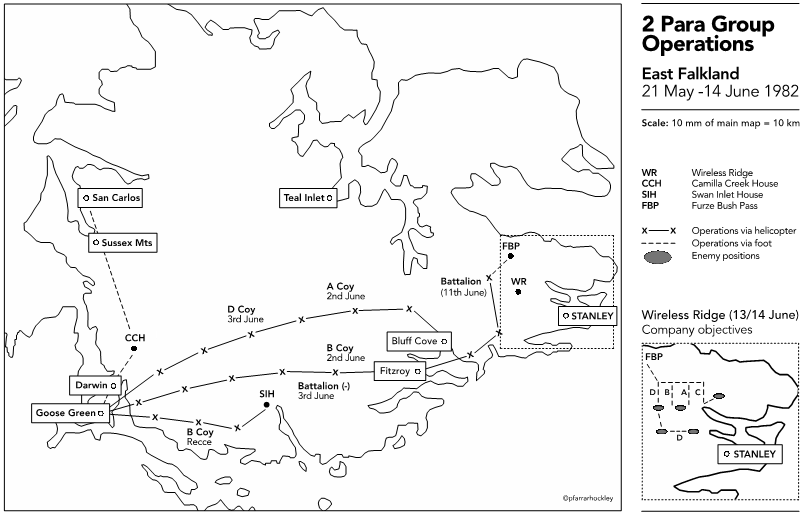
As our passage neared the TEZ (total exclusion zone), the CO issued “Op O 2/82 OP Sutton” (the operation order which would launch us into action). Signed on 14th May, it determined that “2 PARA is to land at San Carlos and establish a defensive position on Sussex Mountains.” Subsequent paragraphs defined the phases by which we would achieve the mission, commencing with a silent night assault landing from LCUs onto Blue Beach 2. The tasks of each company were broken down, not least the mix of fire support assets which would be allocated on the defensive position: fire controllers for artillery and mortars, a section from the machine-gun platoon, a sniper pair and so on. Each man, in addition to his personal load of more than 100lbs, carried two mortar bombs to be dropped at a base plate position as companies ascended the mountain.
The attached intelligence annex highlighted factors which would have a bearing on the campaign. Under ‘strengths’, for example, the Argentine land forces were twice the size of 3 Cdo Bde…had time to select the best ground upon which to fight…could move at least two hundred troops by helicopter in a single move; and local air superiority was likely through PUCARA. The brief suggested ‘weaknesses’ in both logistics and morale. While we had no knowledge then of where our first battle would take place, it is of interest that the brief also stated: “Goose Green/Darwin. (1) 300-500 troops including Infantry Company, Air Defence and Air Force Elements. (2) PUCARA aircraft known to use the airfield.”
The issue of air superiority is an important one. Our training in the UK whether for operations inside or outside NATO’s area of responsibility presumed a state of air superiority. It is difficult to recall a single day of the campaign where air superiority was achieved. While parity occurred on a handful of days, for the most part, the Argentine air threat over land dictated the importance of night operations, for which we were well prepared at coy level. The Task Force aircraft operated from carriers, which for the essential security of the fleet needed to be at a distance off the Falklands. Despite being at the limit of their range, the more numerous Argentine aircraft operated effectively throughout the campaign from bases in Tierra del Fuego and elsewhere — notwithstanding the loss of twenty-nine pilots. (4)
The padre was concerned that there were no orders regarding the disposal of the dead and their effects. The CO directed him to take ‘four or five portable crosses’ with him, which the assault pioneers produced with a degree of reluctance.
Frustration on Sussex Mountains
While the landings on the night of 21st May were unopposed, they were not without incident. First, disembarking from the Norland led to an early casualty. A significant swell made descent into the landing craft hazardous, heavily laden as we were.
The lead LCU, carrying C Coy, the CO’s Tac HQ and A Coy hit a sandbank close to shore, requiring B Coy in the second LCU to land first. Preparing to move off from the beach, the OC went forward with a recce party and observed three soldiers approaching. Challenging them, the reply came back: ‘SBS. Who are you?’ Learning that we were 2 PARA, they replied disconcertingly: ‘we thought you were coming tomorrow!’ “Par for the night,” said OC B.
By first light we were up on Sussex Mountains, providing a southern arc of security for the landings and ships in San Carlos Water unloading essential materiel. There could be no doubt as to our purpose. Reaching the summit, A4 Skyhawks flashed overhead, hugging the bald terrain intent on sinking Task Force shipping. We were at war.
Conditions were as we anticipated: wet, cold and increasingly bleak as winter approached. High winds were a constant factor. Before the days of goretex and without arctic warfare clothing, the battalion endured the elements, physically toughened in mind and body by demanding training. In one of many discussions with ‘H’, company commanders estimated we were good for at least a month operating in such conditions.
A key element of any defensive posture is to seek out the enemy by exploring ‘no-man’s land’, with a view to learning more about him and getting inside his decision cycle. Here we were frustrated by an order limiting patrolling lest we conflicted with SAS patrols operating forward in the Darwin & Goose Green area. Morale was not enhanced either by the enemy’s air raids, as we witnessed the sinking of both HMS Ardent and Antelope — unable to assist effectively in this daily duel.
In A Company’s location, a RAPIER missile system struggled to operate, frustration mounting because it couldn’t take on incoming aircraft: “...initially unreliable as a result of the long sea journey and the lack of second line support. It was also hampered by the low altitude of enemy air attacks…” (5)
Information was scant on how the world viewed our situation, as the Task Force went about the essential business of getting stores ashore and preparing for action. To fill this void, once a day we tuned in briefly to the BBC World Service using artillery radio nets to learn more, and to give our soldiers a broader understanding of events.
As we pressed ‘H’ to acquire clearance for an aggressive patrolling plan, the situation changed. A warning order from Bde HQ required 2 PARA “to march south to conduct a large-scale raid upon the Argentine positions at Darwin & Goose Green.”(6) None of us saw the wisdom of this plan, effectively attacking strongly prepared defensive positions from the north — the obvious direction — with minimal support. Our counter proposal of sending elements of 2 PARA south of the airfield by helicopter to effect surprise was scotched by Bde: “There were no helicopters for them to do so…” (7)
A day later, on 24th May, D Coy set off ahead of the battalion at last light to secure Camilla Creek House, only to be called back eleven miles down the track. Poor weather — and priority to an SAS operation on Mt Kent — had made it impossible for helicopters to bring forward artillery to support the attack. The operation was cancelled, a dispiriting moment for us all! The inadequacy of the issue DMS boot in such terrain was now apparent. Twenty-two miles of precious foot mileage had been wasted: a point made by Major Neame (OC D Coy) to the CO.
Two days later, the CO received further orders: the operation was ‘on’ again. This time the whole battalion — some 450 fighting men — would march south to conduct a battalion attack. As Hastings explains: “In the intervening forty-eight hours, Brigadier Thompson had made a renewed attempt to convince Northwood that the southern isthmus could be masked while his forces made a decisive push on Port Stanley. He failed, ordered by General Trant to proceed with the move on Goose Green.”(8) Support would be confined to three 105 mm guns, with limited ammunition, after an air attack on the Atlantic Conveyor destroyed six Wessex, three Chinook and a Lynx. One Chinook (call-sign BN) which had taken off to test engines escaped the attack.
Preparing to move, Mrs Thatcher’s unequivocal instruction, heard on the BBC radio, came to mind: ‘I want to see the British flag flying once more over Port Stanley,’ uncertain how the forthcoming operation would contribute to that strategic aim.
Night Approach to the Darwin & Goose Green Isthmus
Leaving Bergen rucksacks behind, cached on Sussex Mountains, D Coy once more led the way to secure Camilla Creek House as an assembly area. The CO briefed OC D Coy of his intention to conduct a raid in strength. This was not without problems — a portent of others to come. Camilla Creek House had reportedly been adjusted by artillery. Nearing the settlement, OC D requested a fire mission as a deterrent to enemy in the area and, in the pitch-black night, to confirm how far he had to go to the settlement. Surprisingly, the rounds landed 1000 metres behind them, causing D Coy to continue the advance on a prayer. When the Battalion arrived some two hours later, OC D learnt that the mission had been ‘upgraded’ from a raid to the capture of Darwin and Goose Green.
By now, it was the middle of the night. The CO took the bold decision to get as many of us as possible into the substantial farmhouse and outbuildings. Soldiers sat or lay on floors, in cupboards and on shelves, huddled together out of the wind, to gain a precious few hours of sleep, and to aid concealment in the coming daylight.
A while before first light on 27th May, as OC D relates sitting in the same room as the CO, a signaller tuned into the World Service of the BBC only to hear: “It was announced in parliament this evening that a parachute battalion is now within 7 miles of Goose Green.” The CO was apoplectic. Not only was surprise lost, but Camilla Creek was the obvious assembly area for such an assault. With incredulity, men hurriedly left the buildings to disperse into the surrounding countryside, before the enemy air force could take advantage of this target so carelessly given them: an unsettling start to a crucial day for the CO as he prepared his plan for our attack in the early hours of the following morning.
Bold, skilful reconnaissance by C Coy that morning — with information from a POW they captured — provided intelligence to perturb the CO further: it indicated that the enemy was indeed ready for an attack from the north.
Orders for Battle
It was to be a day punctured by mishap. Called to the CO’s late morning ‘O Gp’, not everyone received the call, long before the days of mobile phones. Arriving at battalion HQ, the colonel’s frustration was evident as an incomplete grouping settled down. A quiet suggestion to the adjutant that we make a brew and wait was turned down. A first opportunity to mark maps and acquaint ourselves with the CO’s concept was lost. It would be another four hours until we reassembled, precious time that as events turned out would not be made up in the coming night’s operations.
Reassembling in late afternoon, the CO directed that ‘2 PARA is to capture the Darwin & Goose Green area’ — critically, taking the two settlements in daylight to avoid killing the civilians we had come to free, after a month of captivity. While some have criticised ‘H’ for this decision, collateral damage to civilians continues to plague NATO operations to this day.
The ‘O Gp’ was understandably a tense affair. The CO’s plan was for a six-phase night/day battle. However, it contained no reference to what proved to be the ‘vital ground’ nor who should capture it. The reasons were simple; first the ‘vital ground’ was not expressed as such; second, the intelligence picture given — with ‘H’s’ frequent urging to hurry up — did not come across in a clear geographical sequence (the marking of maps followed rather than preceded the orders), thus the significance of what might have been there was lost.
In the limited time after the orders as darkness beckoned, brief exchanges took place on key coordinating points although surprisingly not with OC Support Coy. Looking for him to tie up elements of fire power, it was disappointing to learn that he had been despatched during the orders process to set up the Fire Support Base (FSB) overlooking Brenton Loch. Had we marked maps before the orders, we might have spotted the unusual decision to site Support Coy out of range of any of our critical targets, quite contrary to the principles discussed on the voyage down of splitting fire teams to create a balance going forward. The padre had expressed his concern to the CO in siting the snipers with the FSB ‘because it would put them out of effective range of Boca House’, but did not push the issue, accepting that it might not be the best time to advise a CO of a weakness in his plan. A further important lesson would soon emerge: the need for a realistic appreciation of time and space. This aspect of the ‘Orders’ was wildly optimistic, which against a more professional army could have cost us the battle.
In truth, all save a handful of men were new to conventional war, and that included the CO. Korea, thirty years before, was the last time that British troops had fought such an engagement. One of our earliest lessons was that we would all make mistakes: there were simply too many unknowns. The key was to learn from them more quickly than the enemy.
The Battle for Darwin & Goose Green
Led by one of the teams from C (Patrols) Coy, over challenging terrain, A Coy reached its drop off point half an hour behind schedule. At 0235 Z on 28th May, Major Farrar-Hockley (OC A Coy) launched the attack on Burntside House, with the aim of clearing the neck of the isthmus so that A and B Coys could progress south towards the settlements. Inaccurate intelligence (“the civilians in the house have left but it is now in enemy hands”) meant that we nearly killed the Morrison family. Happily, that was not so: but two Argentine soldiers just to the north of the house were killed while the remainder of their section — we were never quite sure how many — disappeared into the night.
A Coy then set off along the east side for what looked to be our most challenging task of the night: to destroy an enemy company (minus) on Coronation Point. So, 80 or 90 enemy, perhaps, holding a small feature on our direct path, hemmed in between the sea on our left and a track on our right – the boundary with B Coy. Not more than a kilometre of frontage and no room for an out-flanking attack. To our considerable surprise, the position was devoid of enemy.
Given that daylight was not much more than an hour away — in spite of the fact that the orders required A Coy to be ‘in reserve’ for the next phase — the OC sought permission from Battalion HQ to move forward: on three occasions this was denied. ‘Wait for the CO to join you’. As it was, he arrived more than an hour later — close to first light — insistent that the company got going.
Placing 3 platoon on the edge of Coronation Point to give covering fire for our assault on Darwin Settlement (our final objective) we were ambushed from the crest of Darwin ridge (some 100 feet above and to our right) as we made for the security of the gorse gully and the base of Darwin Hill.
The immediate action of the leading sections was to take six or seven trenches at the base of the gully in short order. What followed as dawn came up was not to be so easy. Under cover of darkness, the advantage was in our favour: we could get amongst the enemy and overwhelm them with our aggression. ‘H’s mantra was that if we hit the enemy hard he would fall. In daylight, the enemy had other ideas, advantage shifting to them as they picked us off at a distance: thus, our rapid early success ground to a slog.
Of what did the enemy comprise, and where were they sited? Since orders for the battalion attack contained no plan to capture Darwin Hill nor the ridge to the west, it was a surprise to find it so heavily defended. Initially pressing 2 platoon to try and outflank the enemy by heading up to the top of the gully, it became clear that sniper and fixed line machine guns would make that impossible. If we were to achieve a quick outcome (‘H’s intent) it would be essential to get the enemy’s head down with a bombardment of some description.
Our training had been in the all-arms battle; but it was good that we had also trained for the unexpected. One by one, all the fire support assets which had been ‘on call’ were denied. Fog at sea prevented harriers taking off; so too the attack helicopters of the day. The battalion’s artillery support was woefully small given the loss of the Atlantic Conveyor. We had knowingly gone into battle ‘under-gunned.’ With Support Coy located to the NW of the isthmus, the rifle companies found themselves ‘out-gunned’ since none of the fire teams at the FSB could engage the enemy — save the valiant efforts of a section of mortars, despite high gusting winds and limited ammunition.
The cold light of day brought a reality check. While B Coy was held up on the Gorse Line and the forward slope beyond by enemy at Boca House, A Coy too was on its own. Attrition, rather than manoeuvre in the all-arms battle, was the order of the day. While there was no doubt that we would capture the hill, there was no way of knowing how long it would take, nor the cost in lives.
Here it is important to explore B Coy’s night operations. After waiting on the start line for over an hour whilst A Coy cleared Burnside House, OC B Coy gave the sign to fix bayonets. The Coy moved forward with 4 and 6 Pl leading. Thirty metres out movement was seen and engaged with machine-guns. Both platoons advanced with fire and manoeuvre against what was a strong enemy platoon. Within 30 minutes this was cleared with no casualties to B Coy. Many enemy surrendered, were disarmed and left in their trenches. B Coy continued their advance, briefly coming under fire from D Coy who were now engaged in a fierce fight with what later emerged as the eastern flank of a company position. Progress was slowed by having to negotiating a minefield. Further down the isthmus 5 Pl took out a AAA position using LAW rockets, again with no casualties, but the enemy responded with artillery fire onto this position. This attack left the Coy considerably disorientated — the OC using his sabre light beacon to reorganise.
Pushing on, encountering stragglers trying to escape south, they crested Darwin ridge at first light. Shortly after, they found themselves on a forward slope. A machine gun opening up from Darwin Hill soon emphasised the danger they were in. The ground was frighteningly open, with only the Gorse Line to grovel behind. The OC determined to advance with two platoons, leaving his Coy 2IC with a third platoon to cover their advance. They skirmished forward under cover of smoke from white phosphorous grenades, but at the cost of one soldier KIA and two wounded. Heavy machine gun fire from the Boca position, a kilometre ahead, and protected by a large minefield, brought the advance to a halt.
Meanwhile, D Coy, the CO’s immediate reserve, had brought up the rear of the battalion, as it meandered during the night from the Assembly Area to the Start Line. This was not a clever place to be, as Bn Main HQ stopped at the bridge over the mouth of Camilla Creek, leaving D Coy blundering through this mass of men, trying to identify their C Coy guides. Finding their allocated start point, they could hear A Coy launch into action on their left. Shortly after, on their right, the night sky burst into life as B Coy attacked their phase 2 objective. Then the CO and his Tac HQ appeared. “What are you doing here?” he demanded. “Waiting to get stuck into the battle” replied the OC. “Well you shouldn’t be here. You’re supposed to be behind me.” Then, with his irritation expended, the CO said: “I’m thinking you might be able to go straight down the track in this darkness, and get behind the enemy. I’m going on to see.”
After A and B Coy initial assaults had subsided, the CO was back. “I’ve just been shot at from that hill,” as if he had suffered a gross indignity: “Go and sort them out.” Unable to identify the hill, OC D Coy ordered an advance to contact with 12 Platoon leading, quickly drawing enemy fire and launching into an assault. The air was thick with tracer, but far too high, and the position was taken without casualties. Many of the enemy hiding at the bottom of their trenches suggested that the intelligence from the SAS was right – ‘no will to fight, knock’em hard and they’ll fold.’
As 12 Pl began to re-organise, more small arms fire erupted from the west, 10 Pl at right rear reporting casualties. Quick thinking by 11 platoon delivered a decisive right flanking assault on the enemy, but in the process picked up further casualties of their own.
Now came the need to reorganise. In contact, soldiers had been drawn in all directions: in the intense darkness, finding their position in relation to the ground and their comrades was akin to a game of blind man’s bluff! Abandoning School of Infantry doctrine, the OC resorted to putting up a flare to show his own position, instructing his platoons to re-organise on a clock ray. Then, it emerged that four men were unaccounted for: in fact, three were dead and one wounded in a variety of assaults on the enemy.
To the exasperation of the CO, this reorganisation took over an hour. The inadequacy of the plan’s time/space appreciation was becoming self-evident. As daylight emerged, the battalion’s advantage in night fighting evaporated on the wide-open terrain. D Coy found itself a kilometre behind the gorse line, beside a minefield, as A Coy’s battle for Darwin commenced.
Battle is by nature chaotic and brutal: A Coy’s experience was to be no different. Our strength lay in the qualities of the airborne soldier. Guts, an utter determination to succeed, professional fighting skills of the highest order, unstinting support for one another, ABI (or ‘airborne initiative’) — that indefinable sense of taking the initiative, whatever your rank — and a brand of infectious, dark humour: all were needed.
Such initiative led to a series of sporadic sorties from different parts of the gully to test the opportunities to close with the enemy. With the establishment of an ad-hoc fire base, intertwined sections of 1 & 2 platoons began in small groups to fight their way up the hill; a slow, demanding task, progress effected simply by skirmishing in small groups. Control was crude, principally by NCOs shouting to those nearest to move or give covering fire. Literally, we clawed our way up the slope, with little more than tiny folds in the ground to give cover on the bare terrain: a billiard table as some have described it. The situation was not aided by enemy artillery fire — controlled as we later discovered by an observation post on Mt Osborne to the north of the isthmus.
Exceptional leadership from Cpls Abols, Camp and Sgt Barrett was evident. But they were not alone: many others — not least those we lost in battle — junior NCOs and private soldiers among them, made a major contribution to the success of the day against a determined enemy company well dug in with rudimentary overhead protection, supported by artillery, and heavy and medium machine guns. Meanwhile, 3 platoon, still manning their fire base overlooking the settlement were eventually driven off their position by .50 machine guns; the GPMG in the light role no match for these. Reaching us in the gorse gully, they brought additional firepower to the assault.
It was in the midst of these fierce close quarter engagements that the CO was mortally wounded, carrying out a lone charge against an enemy position, unseen by A Coy, but driven by his passion to lead by example — never expecting his soldiers to undertake what he would not do himself.
As we closed on the enemy trenches — after something over three hours — the combination of hand held LAW rockets and machine guns proved decisive. The enemy company surrendered after we had inflicted more than 60% casualties upon them: 18 dead and 39 wounded. Some 200 men had fought against one another at a cost of 74 casualties. Lt Esteves was posthumously awarded the Argentine’s highest award for valour.
Taking the surrender on this small corner of the battlefield, it was important not only to deal urgently with casualties but to prepare for counter-attack; for this, as possession revealed, was the ‘vital ground’ dominating the isthmus in every direction.
Following the wounding of the CO, command fell to the 2IC, Major Chris Keeble. Unable to contact the BC, the most senior officer in Bn Tac HQ, he delegated control to OC B, ordering OC D to try and link up with B Coy. In response, OC B stressed that it was vital to maintain momentum, so could not wait until joined by the 2IC, further requesting that MILAN and medium machine guns from Support Coy be brought forward to counter the heavy machine guns on the Boca position which had him out-gunned.
More than an hour after Darwin Hill was captured by A Coy, the 2IC joined A Coy and Tac HQ, his party bringing vital resupplies of ammunition, and medical support for the RMO, who had already walked forward to assist with casualties, before their subsequent evacuation by helicopter. Soon after, white flags were flying from the Boca position, thanks to the combined attention of B Coy’s well-directed use of MILAN, and the fire of twelve of D Coy’s GPMGs, who had managed to get within 500m of the position along the western shoreline. The surrender at Boca was taken soon after (see below).
The 2IC’s initial proposal was to send A and C Coys forward to join B & D in the fight for Goose Green. OC A’s appreciation was slightly different. First, the coy had suffered fifteen casualties and these were an immediate priority along with the need for resupply of ammunition. Secondly, Darwin settlement, below, was still not secure; and the hill provided a dominant position from which to influence the battle. The 2IC agreed the OC’s suggestion to send only 3 Pl forward to join C Coy. Caution was providential, for as C Coy were half-way down the forward slope, they came under withering AAA fire from Goose Green, with several casualties inflicted on its Coy HQ. 3 Pl wisely withdrew to re-join A Coy.
As A Coy had commenced their fight for Darwin Hill, D Coy had a good view of the battlefield. Around them were scattered Argentinian dead, the outcome of some of B Coy’s work during its earlier push south in the dark. Then, enemy emerged, probably by-passed by B & D in the night, heading south along the western shoreline, before disappearing back towards their own lines. While out of range, it occurred to OC D that he could use the same ground to execute a right flanking manoeuvre on the Boca position, thus taking the pressure off A & B Coys.
Putting this to the CO now located with A Coy, the OC was firmly told to stay where he was and keep off the battalion net. A while later, enemy artillery ranged onto D Coy. Assuming their observer was operating out of Goose Green, the OC moved into the reverse slope of the ridge ahead. Challenged by the CO, D Coy’s move was approved. Thus encouraged, the OC again suggested the possibility of a flanking attack along the western shore. By then, C (Ptl) Coy was close by in depth, so the risk of investigating appeared minimal: “Don’t tell me how to run my battle,” was the CO’s response. Had the CO been with D Coy, his principal reserve, he would surely have seen that there was a clear option to unlock the logjam in which A and B Coys found themselves.
Finding shelter in a fold of the reverse slope, the OC could now see a secure route down to the shoreline, and again told the CO, but again his request was rejected. Concluding that the Coy would be going nowhere for some while, the OC instructed his men to brew up and take on some fuel — it promised to be a long day. As porridge came to the boil, the picnic was interrupted by a call over the Bn net: “Sunray is down!” Within minutes, instructions came from the Bn 2iC to try and link with B Coy and help them. Brews in hand, D Coy, doubtlessly looking like vagabonds, set off.
Cresting the ridge, they came under effective enemy fire. Determined not to become pinned down on a forward slope, the OC withdrew his company, and tested on the 2iC his proposition to recce the shoreline for a right flanking manoeuvre. Agreement was given.
On the shore, good progress was made until they approached the ruins of Boca House. Ahead was a small bay, where open ground would expose D Coy to the troublesome Argentinian position, with its heavy machine guns, 500m beyond. Now in range to use their own GPMGs, however, the Coy set up a firebase of twelve MGs and started to engage. Soon after, OC B called on the anti-tanks, now on Darwin Hill to engage with MILAN. As these destroyed the enemy bunkers, D Coy’s firebase machine-gunned the survivors as they sought new cover. White flags started waving from the position.
OC D proposed to the 2IC that if this was an attempt to surrender, it should be taken, saving precious ammunition and time. There was long equivocation – was this too great a risk? Why not engage the enemy from afar? OC D Coy pushed the issue by saying he would shortly be cut off by the incoming tide — although there is negligible tide in the Falklands. Permission was granted, a ceasefire ordered. D Coy set off, heart in mouths, on the longest 500m of their lives.
Despite tripping a mine and a rogue final rocket from MILAN, the Coy secured the position without serous mishap, finding a scene of devastation with many injured enemy. Ahead, lay Goose Green airfield, with a good score of men running across it towards the settlement, still three kilometres away. Exploitation called!
Leaving 10 Pl to mop up the position, D Coy advanced, led by 12 Pl. Cresting the airfield, they attracted the attention of enemy AAA guns firing at them in the ground role. Searching cover, the company veered left into a shallow valley that led towards the Schoolhouse, just north of Goose Green — reportedly an enemy strong point. Approaching the main track into the settlement, 12 Pl found themselves in a minefield: progress slowed. Pushing them onto higher ground from where they might provide supporting fire, 11 Pl now took the lead. After neutralising what looked like an abandoned command post with LAW, they crossed the track into dead ground from the school in preparation to attack. The OC called for an artillery fire mission, but was told the guns were unavailable, engaging in counter-battery fire. This was clearly wasted effort, because D Coy now started to come under sustained fire from the enemy battery.
Unexpectedly, elements of C Coy who had survived the AAA fire on the forward slope of Darwin Hill now began to arrive — unhelpful, as they added to the numbers being engaged by the enemy artillery. Casualties resulted, exacerbated by the AAAs peppering the casevac route to the RAP. With no hope of artillery support, the OC ordered 11 Pl to attack.
In the chaos of battle, there came the White Flag incident. Responding to a series of white flags beside enemy dug in close to a flagpole, OC 12 Pl had gone forward with a section towards the settlement to take a surrender. Alas, the message from the OC to stop, as the rest of the Bn were unaware of this initiative, never got through to him. A burst of fire, probably friendly, from elsewhere on the battlefield resulted in inevitable confusion. From point blank range, the Argentinians opened fire with lethal consequence.
By the time, the OC arrived on the scene, Sgt Meredith had stabilised the situation. In the process an Argentinian ammunition dump had been set on fire, now providing an impressive firework display.
The assault on the school meanwhile had been undertaken with some elan, white phosphorous grenades raising it to the ground. But, now under direct fire from the settlement, across the stream mouth, 11 Pl had to withdraw, joining 12 Pl on the track leading to the settlement.
The 2IC now intervened, ordering D Coy not to advance further, as a HARRIER airstrike was in bound. Hearing aircraft approaching, the men of D Coy prepared to enjoy the imminent firepower demonstration. Instead, an Argentine SKYHAWK, its cannon stitching a hypnotic pattern towards the company, provided a perfect target on the track. With shells exploding within arms’ reach, mercifully not a man was hit. The aircraft departed, trailing smoke, before crashing — either from the company’s intense small arms fire or from BLOWPIPE on Darwin Hill. Minutes later, approaching jets could again be heard. Nervously, the Coy waited but was relieved to see three HARRIERs delivering a blow to the Argentinian field guns and AAAs.
As D Coy prepared to continue their advance, inexplicably they were ordered to go firm on the reverse slope from the settlement. Rather than stay on the track as a perfect target for enemy air, the Coy took their chances in the minefield to its west. A sound move, as shortly after more aircraft were heard, this time an enemy PUCARA which flew over and released a napalm bomb uncomfortably close to Coy HQ. They sustained no damage, shot down the aircraft and captured an apprehensive pilot.
As the Coy settled into its position, exhausted and down to its last rounds of ammunition, darkness descended. Ammunition came forward, dead and wounded were eventually evacuated. The position was potentially perilous, but there was a feeling that in the previous two hours which had truly reflected the chaos of war, the enemy had played his last card. This was later confirmed by news that negotiations for a surrender were under way.
While C and D Coys were engaged on the northern approaches to Goose Green, B Coy had moved off across the airfield using two streams for cover to get to a point where they could control the western approach to the settlement, and if necessary, assault from the rear. During their advance they attacked several AAA crews who fled back into Goose Green. Having not heard from the 2IC since the Boca House battle, OC B updated him on their position and asked whether they should attack the settlement – unaware that negotiations were in hand. Telling him to stay where he was, the 2IC could say no more.
Reviewing his situation, OC B Coy ordered his men to withdraw to a slightly raised area – a better place, he judged, to form a defensive position. As last light approached, B Coy heard a CHINOOK with other helicopters landing SW of Goose Green. Spotting troops disembarking, he ordered his FOO to call a fire mission which appeared to be on target. Briefing his men, he explained that they were now on their own some 2km from D Coy and the rest of 2 PARA, with the possibility of enemy reinforcements coming from where the helicopters had landed. The threat of a counter-attack now seemed real; the Coy had been in continuous action since crossing the start line some 12 hours earlier; fatigue was setting in, and ammunition was low. Ordering them to dig in until 0200, he urged them to look after one another, using the ‘buddy-buddy system’ as a cold night had turned to snow. As the OC opined: “It is not the number of soldiers, but their will to win which decides battles.”(9)
Surrender/Aftermath of Battle
Thus, only after a further five hours of fierce fighting by B, C and D Coys, following the capture of Darwin Hill, was Goose Green finally surrounded. Here, Major Keeble came into his own. While several options presented themselves, including reinforcements from 3 Cdo Bde, information that 112 civilians were locked up in Goose Green’s Community Centre concentrated minds. The 2IC drafted an inspired ultimatum overnight to the Argentine Commander in the Darwin/Goose Green Area, which, after negotiations on the airfield the following morning, assisted by Robert Fox and Captain Bell of the Royal Marines, led to their dignified surrender and the release of all civilians unharmed.
‘A total of 961 prisoners were accounted for with reports of some 50 Argentine dead and buried.’ The Bde log for 29th May recorded, at 1642 Z: ‘The Union Jack has just been raised over Goose Green Settlement.’(10)
And what of our CO’s contribution both to the battle and to the campaign? No one should underestimate the loneliness of command in what was the first land battle of the campaign. His determined lone charge against the enemy on Darwin Hill was seen only by his tactical headquarters. Not long afterwards, the enemy had surrendered. In addition to his ‘Supreme Courage,’ (11) ‘H’s’ decision to set us to a difficult task, conscious of the strategic importance of an emphatic victory after nearly a week of relative inaction by the Task Force, spoke too of his moral courage. His example, will and leadership remained with us for the rest of the campaign, and made us the more determined: H’s legacy.
As Freedman records: ‘Lt Col Pike (CO 3 PARA) later described Goose Green as the “moral turning point”, in that “before we understood that we had to win, whilst after it, we knew that we would.” This was the battle’s objective by those who had been pressing from London for action.’(12)
Freedman sums up the battle thus: ‘From conception to completion the battle had an improvised quality and was not a model to follow for the future. A less resilient battalion might well have been defeated… the lessons learned about the importance of night fighting and the role of firepower were reasons why Thompson developed a more positive sense of the battle’s value. It signalled determination and opened up the southern route to Stanley.’
Licking our wounds, burying our dead in a temporary grave, regathering ourselves after the storm of battle, the battalion maintained its defensive posture while engaging with the Islanders and looking after POWs.
With the death of the adjutant, the padre undertook the important task of collecting our dead, while Support Coy were responsible for collecting Argentine dead. Seeking volunteers from B Echelon, he commandeered a RM Volvo Snow Cat and set off. Knowing who was unaccounted for, it became a matter of establishing where they had last been seen. ‘I remembered only too well that at Warrenpoint, in Northern Ireland, we had got the names of some of our casualties wrong in the confusion that followed the roadside bombs. While I personally identified our dead at Goose Green, the RSM went back to Ajax Bay to carry out the same task there, aided by notes kept at the RAP of casualties and their whereabouts. Centralising our dead in the garden of the house where Bn HQ had established itself, I left a sentry in charge.’ Soon the battalion came under pressure from Bde HQ to release the names of our dead. ‘I refused to do so until the RSM and I had verified each one. It took a couple of days, but I’m sure it was the right decision.’
There was further delay in obtaining a helicopter to ferry our dead to Ajax Bay. The padre’s attempts to hijack a Sea King failed, priority given to reporters! The importance of guarding our dead soon became apparent. While much credit fell to Messrs Fox and Norris — our ‘embedded’ journalists who had marched all the way from San Carlos to Goose Green — the new arrivals were an unknown quantity: ‘they began to take a morbid interest in filming our dead. The doctor was furious and sent a soldier to see them off.’(13) – which he did at the point of a rifle!
While 3 Cdo Bde deployed East towards Port Stanley, 2 PARA was reassigned to 5 Infantry Brigade, recently arrived from UK. On 30th May, Brigadier Wilson, the commander, arrived in Goose Green to explain his concept of operations. With limited assets of his own and no dedicated helicopter support, his approved design to open a southern route to Stanley meant we would walk. Perfectly possible, moving by night, but lying up for ten hours of daylight each day, with no cover and without air superiority, appeared unwise.
When OC B Coy visited A Coy after the battle, a fortuitous conversation with Brook Hardcastle, who lived in Darwin House, elicited the fact that the civilian telephone link between Swan Inlet House and Fitzroy Settlement might still be intact, with the potential to provide up to date information on Argentine troop positions at key points along the southern route.
Returning to Goose Green, OC B Coy dropped into 5 Bde HQ, next door to 2 PARA’s HQ, where he noted on a map in the ops’ room that 2 PARA was at the back of the Bde’s intended order of march towards Stanley. Appraising Brigadier Wilson about Swan Inlet, he volunteered to take a party to call Fitzroy, to establish the whereabouts of Argentine forces. Despite no air cover and the threat from enemy PUCARA aircraft, Wilson approved. OC B led the raid, consisting of three Scout helicopters and half of 6 Pl, flying low, establishing that there were no longer Argentinians in the vicinity. ‘We’ll be with you shortly,’ he assured a surprised Ron Binnie.
Meanwhile A Coy – brought to immediate notice by the 2IC to exploit the outcome – took off in the hastily commandeered Chinook (BN) which had been engaged in ferrying POWs from Goose Green back to San Carlos, flanked by two Scout helicopters with SS11 missiles, to secure Bluff Cove, twenty-eight miles across No-Man’s Land, onto an LS manned by C (Patrol) Coy.
Bluff Cove and Fitzroy
By nightfall, the majority of A and B Coys were digging in at Bluff Cove and Fitzroy respectively, the former twelve miles from Port Stanley, anticipating counter-attack. At Bluff Cove, as shovels dug into the peat, a settler approached OC A Coy offering to feed the men: an astonishing act of kindness, whittling down their winter reserves. Through the night four men at a time left their defensive position to receive a welcome hot meal in the settlement.
When D Coy was flown in the following morning, pushing a 3km bound further east onto a hill overlooking the track into Stanley — in sight of the enemy on Mount Harriet — they soon began to attract the attention of 155mm artillery. Once again, the battalion was perilously short of all arms fire support.
A bold plan had succeeded, with the remainder of the battalion moving to Fitzroy. But it was a close-run thing, with poor communication between 5 Inf Bde and 3 Cdo Bde narrowly avoiding disaster: an OP from 3 Cdo Bde spotted troops disembarking at Fitzroy and called for a Regimental fire mission. At the last minute, an observer recognised British helmets. More importantly, it left Wilson’s brigade unbalanced: ‘His overriding priority was to reinforce Fitzroy and Bluff Cove to ensure that those already there could withstand a counter attack.’ (14)
Into this febrile situation emerged Lt Col Chaundler — 2 PARA’S new CO, recently appointed by the Army Board — who had parachuted into the South Atlantic, been picked up by a frigate and was keen to get to know the men in his new command. Once A and D Coys were recovered from Bluff Cove by LCU after a chaotic night move hampered by fog, the battalion defended the settlement and awaited fresh orders, after being reunited with their bergens and, crucially, sleeping bags. The opportunity to sort ourselves out after two operations in quick succession was most welcome, shelter afforded by the local sheep sheds.
Then on 8th June, tragedy struck. Called to our defensive positions by an air raid warning RED, we could only watch in horror as a pair of A4 Skyhawks emerged out of a clear blue sky flying directly towards RFA Sir Tristram and Sir Galahad where efforts to unload men and materiel were under way. With limited air defence assets, we could only watch this carnage unfold, as both ships suffered direct hits: the pressing need was to help the wounded as they struggled ashore. It reinvigorated our desire to get back into action, before the advance of winter and further setbacks interfered with the urgent need to finish the fight.
Thankfully, we did not have to wait long. On the same day, a decision was taken to rebalance the two brigades for the attack on Argentine positions on the hills surrounding Port Stanley. 2 PARA were only too delighted to return to 3 Cdo Bde.
Following a helicopter move to just north of Mt Kent, B Coy led the Bn eastwards, eventually selecting, with the CO, Furze Bush Pass as a harbour area offering the best protection from harassing Argentinian 155 fire.
The Battle for Port Stanley — Wireless Ridge
As Thompson was preparing his plan, we learned two important things about our new CO. First, he had a firm grasp of the importance of the all-arms battle, and the decided lack of it at Goose Green. Second, he was determined that 2 PARA would be well supported in the coming fight.
As the brigade plan unfolded, 2 PARA’s initial role changed from being in reserve to a requirement on 12th June to attack Wireless Ridge at short notice; but the action was postponed to fit in with 5 Bde’s delayed schedule. “As preparations were being made on 13th June…new intelligence revealed that Wireless Ridge was held by the 7th Infantry Regiment, with four companies occupying all the key objectives that had been set for 2 PARA.” (15)
A chance reconnaissance flight onto Mt Longdon gave coy comds twenty minutes to view their objectives. It emerged that a position reportedly held by C Coy 3 PARA was in fact in the hands of the enemy, requiring the CO to make an extensive change to his plan. Where originally A Coy would start the battle by advancing from the Murrell River to attack an enemy company and Bn HQ on the 250m contour, now, D Coy would lead. As the CO had promised, there was abundant fire support — two field batteries, a ship’s gun, mortars from both 2 and 3 PARA, and a troop of CVR(T)s of the Blues and Royals. He dismissed the concept of a silent attack: the enemy knew we were coming, so it would achieve no element of surprise. This night attack was to be noisy from the start, with the aim that indirect fire would destroy the enemy’s will to fight before the infantry closed. Surprise was to be achieved by manoeuvre.
In phase 1, D Coy was to attack the newly identified enemy company (ROUGH DIAMOND), with one battery in intimate support, while the second battery and CVR(T) engaged the company and regimental HQ on the 250m contour (APPLE TART). Once secured, D Coy was to go firm there. In Phase 2, A and B Coys were to attack and secure APPLE TART, supported by both batteries and the light tanks. In phase 3, C Coy was to neutralise a suspected enemy position near Hearnden Water, while D Coy was to move to a SL on the main ridgeline overlooking Moody Brook. In phase 4, D Coy was to roll up from the west the two enemy companies stretched along two kms of that ridgeline (BLUEBERRY PIE and DIRTY DOZEN), as far as telegraph wires running south from Moody Brook barracks, beyond which the SAS were reported to be operating. Critically, the plan depended on the Scots Guards securing Tumbledown before dawn, since it dominated Wireless Ridge, making it untenable if still in enemy hands. Having learnt from the time/space errors of Goose Green, H Hr was to be 00.30Z, allowing nearly 10 hours for all phases to be completed by first light.
Sitting on the SL, some 1000m from their objective, the mood in D Coy was sombre. There were units in the Task Force yet to fight a battle, and Goose Green had been a close-run thing. Notwithstanding, at 00.45 (the delay caused by fresh intelligence from Bde HQ – see below), D Coy crossed their Rubicon, the supporting artillery barrage guiding and encouraging them towards ROUGH DIAMOND.
The artillery lifted with the Coy some 200m short of the objective, and everyone braced for the inevitable wall of inbound tracer: nothing, save the odd desultory shot. No fight through the objective, simply mopping up. Clearly, many enemy had fled, leaving wounded and a significant number of ‘non-participants’ hiding, as during the night battle at Goose Green, under sleeping bags at the bottom of their trenches.
As D Coy re-organised, a quick and painless process helped by a bright night, A and B began their attack. If the moment before crossing the SL was sombre for D Coy, B Coy had a ‘googly’ bowled their way. Brigade had just advised that there was a minefield between their SL and APPLE TART. The CO conferred with OC B who opined: ‘too late to worry about such detail now.’ Unperturbed, A and B Coys, crossed their SL. Artillery support again delivered. The main challenge proved to be establishing the boundary between the two companies achieved by a lance corporal in each company, aided by a rough track. Mopping up, rather than fighting through, the objectives was all that was required.
One problem was still to emerge, however. As D Coy reorganised on their objective, they began to come under 155mm artillery fire. As in British Army doctrine, the Argentinans had registered their own positions. D coy therefore moved off to commence their Phase 3 manoeuvre early, but A and B Coys did not have this option and had to contend with harassing artillery fire for much of the night, principally ’Air Burst’, as our casualties witnessed.
Phase 3 proved a non-event, C Coy finding no enemy at Hearnden Water. After moving early to their Phase 4 SL, using friendly artillery to soften up BLUEBERRY PIE and assist with navigation to their Phase 4 SL, D Coy had been waiting in the freezing cold for well over an hour, eager to get cracking. Between lulls in the artillery fire missions, they could hear Argentine C130s still busily ferrying in and out of Stanley airfield.
Close to the designated SL was a six-foot peat cliff, running north-south, which offered cover while waiting for the order to proceed. As the Company set forth, the scene felt reminiscent of WW1 films of troops clambering out of their trenches. But no withering fire greeted them. Once again, prolonged, intensive shelling appeared to have broken the enemy’s will to fight. Most appeared to have fled; those remaining gave little resistance. POWs were promptly handed over to the CSM and the team of ammunition resupply/stretcher bearers attached from HQ Coy.
In under an hour, the Coy had cleared the first km of a boulder-strewn ridgeline, finding themselves separated from the final objective, DIRTY DOZEN, by a shallow col. It was already being engaged by the CVR(T) of the Blues and Royals, now located to the north with A and B Coys. Half-right, on the far side of Stanley Harbour, they could see the lights of Port Stanley: an enticing view.
Pausing to recharge magazines, the OC instructed his FOO to call for Fire for Effect on the final objective. A minute later, the relative calm was rent by the bangs, shrieks and whistles of artillery airburst exploding directly overhead. In all, 30 rounds of highly effective fire delivered — but on the wrong target. The surrounding rocky outcrops provided scant protection, but miraculously only one soldier was killed. The FOO had mistakenly called the wrong target number: such are the stresses of war. To make matters worse it then transpired that our final target had not been adjusted — and therefore had not been subjected to prolonged softening up like the other objectives.
Rejecting the OC’s request that they simply go back to the wrongly called target and add 400m, the gunners now began the slow process of adjusting fire. Twenty minutes later, satisfied that rounds were on target, a full fire mission was called and D Coy readied to attack. Suddenly the Fire Mission was halted. One of the six guns had become out of alignment, and rounds were reportedly landing near B Coy. With the other Bty at priority call reportedly low on ammunition, the lengthy business of identifying the rogue gun then ensued. The CO was pressing for D Coy to attack. OC D Coy demurred, since fire being returned towards the Blues and Royals showed that the position was strongly held and the enemy determined to fight. Eventually, after over an hour within the enemy’s eye-line, and conscious that the Blues and Royals firepower might not hold their attention for ever, the OC instructed the FOO to call for a fire mission with just 4 guns. The Coy advanced, 11 Pl left forward, 10 Pl right forward, and 12 Pl in reserve.
Undetected, D Coy got to within 50m of the enemy, when 11 Pl set off a trip flare and discovered they were in a minefield. Suddenly aware of where the attack was coming from, the enemy’s attention pivoted to D Coy. Under intense fire, confidence already rattled by the earlier mishaps, everyone went to ground. It was a critical moment, but leaders at every level somehow resurrected the Coy’s resolve. Advancing once more, 12 Pl took the lead, while 11 Pl negotiated the mines. In the excitement, the OC lost his Bn net signaller, who disappeared temporarily into a large water-filled shell hole, and his FOO.
The Coy took the objective, almost at the run. Once onto the position, the need was to maintain aggression to prevent the enemy conducting a fighting withdrawal along the ridge. It seemed to work, the position secured at a cost of two casualties, both from enemy artillery.
As D Coy re-organised, it continued to be shelled by 155s, and now by small arms fire from Tumbledown, yet to fall to the Scots Guards. Then the enemy mounted two counter-attacks: the first from beyond the limit of exploitation where the SAS were supposed to be; the second from an enemy reserve at Moody Brook barracks. Initially determined, they were quickly repulsed.
As daylight dawned, enemy in droves began to pour off Tumbledown, as the Scots Guards won their day. Incoming small arms fire ceased. Hundreds could be seen leaving Stanley, heading south to Sapper Hill. Fire missions were called on both these opportune targets, only to be met with the by now default response: “Battery unavailable.” An attempt to engage those coming off Tumbledown with GPMGs was forlorn in view of the range, the only outcome being to attract incoming enemy artillery. The OC ordered all engagement to cease, and now re-joined by his damp signaller, tried, with limited success, to convey the scene to the CO. He had to see for himself to grasp the situation.
On his arrival, the CO ordered D Coy to engage with their silenced MGs – again to no effect, except that now the 155s had fallen silent. Without artillery support, the CO mobilised two Scout helicopters equipped with SS11 missiles, and these neutralised the enemy gun position by Stanley Racecourse. Like a light switched off, in less than 30 minutes, we had witnessed the collapse of the Argentine army in East Falkland. There were cries of ‘ENDEX’, as maroon berets miraculously appeared to replace helmets. The CO asked for permission to advance into Stanley.
The Bde Comd also had to see to believe; but, on arrival, immediately released the battalion to exploit the situation. Led by A Coy, 2 PARA was the first unit to re-enter Stanley.
Aftermath
Land Force HQ had determined there would be no victory parade through Stanley. More importantly, our CO thought it appropriate that the battalion went to church. The only way to get to the Service in Stanley Cathedral was to march. Clearly word reached the islanders, as they turned out both to watch and to thank us for what had been achieved.
Speaking to the battalion from the pulpit, the padre set out to address the reflective attitude of the soldiers, all of us trying to come to terms with the campaign. ‘I wanted to put across that the experience had changed us; that we might well return home different people from those who had departed the UK two months earlier. It seemed important to ask each individual to recall what was important to them when they believed their life to have been in danger, and to carry that recognition forward throughout the rest of their lives.’
Greater difficulties undoubtedly emerged back in the UK, the padre reflected, when soldiers found themselves isolated amongst a population with no concept of what the conflict had been like.
As history often relates, the award of Medals after any military campaign brings with them an element of contention. The Royal Navy’s desire to deal swiftly with this matter and bring closure is surely not to be recommended. Citations were required shortly after the surrender and limited to 26 words, including number, rank, name, unit and location. Subsequently approved citations were written by staff far removed from the place of battle. When feverish media and historical interest followed our return to the UK, the focus of attention in 2 PARA centred for months on the 2IC, whose inspired plan to encourage the Argentine surrender at Goose Green was rightly rewarded with a DSO. But the commander of 2 PARA’S successful night and day battle for Wireless Ridge – Lt Col Chaundler — went largely unrecognised (although a very senior officer did offer abject apologies for an inexcusable oversight.) Thus, there was little interest or understanding in the public domain of one of the key battles which opened the back door to Port Stanley, even though some military colleges study the battle to this day as ‘the way to do it.’
In his Official History, published in 2005, Sir Lawrence Freedman opined: ‘Against what was assumed to be an original strength of about 500, up to 100 Argentine soldiers may have been killed. Only 17 were taken prisoner as the rest fled. 2 PARA suffered three dead and 11 wounded. The contrast with the battalion’s struggle at Goose Green was marked. All the hard-learned lessons at the start of the campaign had been applied, with the determination of the paratroops this time fully complemented by naval gunfire (288 rounds were fired), field artillery and light tanks. Thompson later judged the Battle of Wireless Ridge to be a true ‘all arms’ affair.’(16)
It is fitting to close this chapter with thoughts of the Next of Kin of the men we lost in the South Atlantic. Writing to them from the battlefield to give each family a sense of how their loved one died is part of any commander’s responsibility. The relationships which began by letter, developed at a Regimental Service of Remembrance when we returned to Aldershot, and continue today — so too with those who continue to suffer from the mental and physical scars of war.
Our next of kin will be a key focus at the Falklands’ 40th Anniversary Commemoration in 2022 for those members of The Regiment & Airborne Forces who fell in battle. Meanwhile, every year at The National Memorial Arboretum, a service is held to remember all the men who have died on airborne operations since 1940 to which the Colonel Commandant of The Parachute Regiment invites next of kin.
Copyright © 2020 Dair Farrar-Hockley (OC A Coy), John Crosland (OC B Coy), Philip Neame (OC D Coy) & The Reverend David Cooper (Padre)
19th November 2020
Footnotes:
1. Hansard 3rd April 1982.
2. Sir Lawrence Freedman, The Official History of The Falklands Campaign Vol II, (Routledge, 2005), page 727.
3. Richard Connaughton, A Brief History of Modern Warfare, (Constable & Robinson Ltd, 2008), p 73.
4. https://www.naval-history.net/F64-Falklands-Argentine_aircraft_lost.htm.
5. Sir Lawrence Freedman, The Official History of The Falklands Campaign Vol II, (Routledge, 2005), page 726.
6. Max Hastings & Simon Jenkins, The Battle for The Falklands, (Michael Joseph Ltd, 1983), p 236.
7 & 8. Ibid, p237.
9. Charles Wilson, 1st Baron Moran, The Anatomy of Courage, (Constable & Robinson Ltd, 1945)
10. Sir Lawrence Freedman, The Official History of The Falklands Campaign Vol II, (Routledge, 2005), page 575.
11. General Sir Peter de la Billiere, Supreme Courage, (Little, Brown, 2004).
12. Sir Lawrence Freedman, The Official History of The Falklands Campaign Vol II, (Routledge, 2005), page 576.
13. Mark Adkin, Goose Green, (Leo Cooper, 1992), p 264.
Ibid, page 595
14. Sir Lawrence Freedman, The Official History of The Falklands Campaign Vol II, (Routledge, 2005), page 595.
15. Ibid, page 640.
16. Ibid, p 644.
Source:
Dair Farrar-Hockley (OC A Coy), John Crosland (OC B Coy), Philip Neame (OC D Coy) & The Reverend David Cooper (Padre)
Read More
Latest Comments
There are currently no comments for this content.
Add Comment
In order to add comments you must be registered with ParaData.
If you are currently a ParaData member please login.
If you are not currently a ParaData member but wish to get involved please register.